When you have a busy inbox, it can be a real chore to locate particular emails quickly. But being able to sort your email by sender will help you to readily access emails from a specific person and save you time scrolling through your inbox.
Here’s how to sort Gmail by sender, and save yourself valuable time that you could be spending on more important tasks.
How to Sort Gmail by Sender
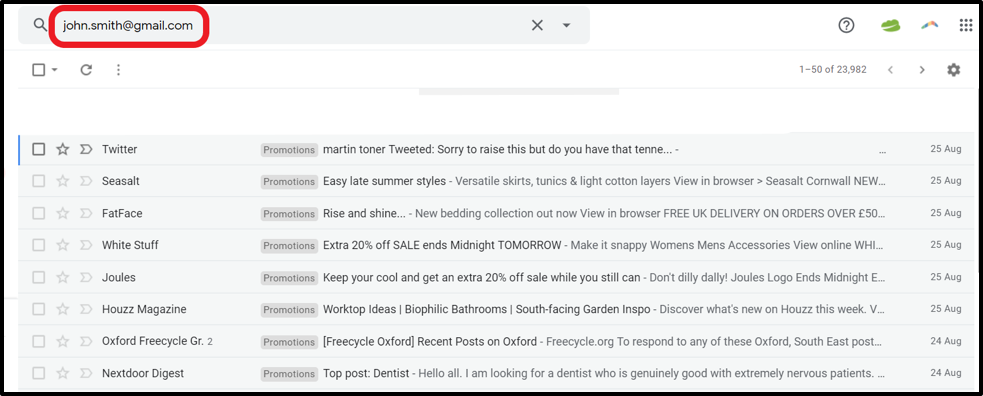
Step 1: Enter the email address in the search bar at the top of your Gmail dashboard.

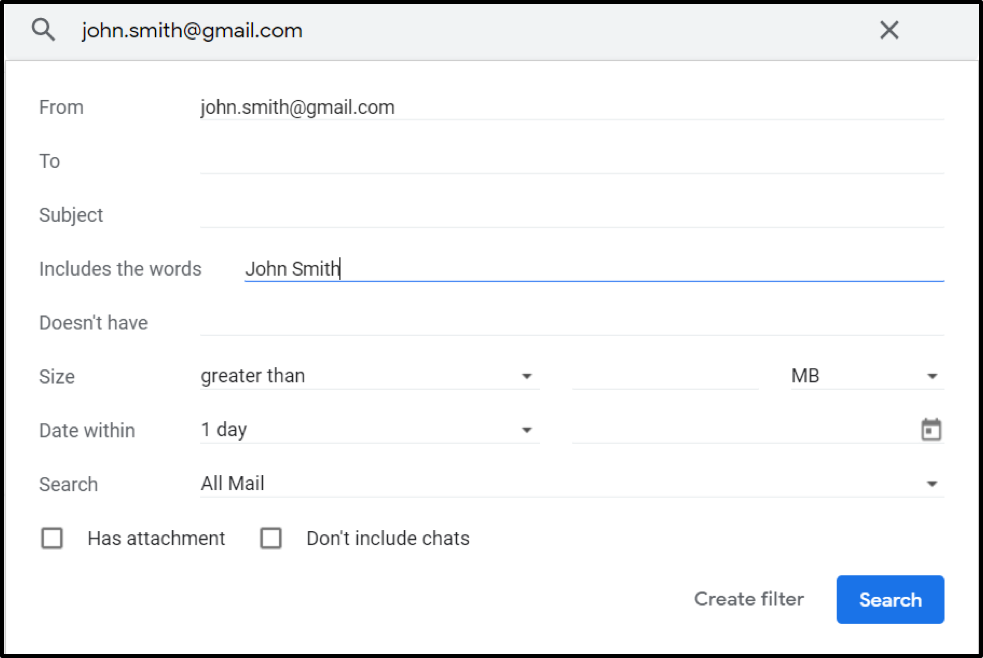
Step 2: Click the down arrow on the right-hand side to locate the advanced search options.

Step 3: The advanced search box will appear, giving you the ability to enter various search criteria. In the “Includes the words” field will be the email address you’re searching for. Cut and paste this into the “From” field. Now, in the “Includes the words” field, enter the first and last name of the contact you’re searching for.

Step 4: Click Search.
If you want to set up a filter so that you can easily identify emails from a specific sender:
Step 1: Repeat steps 1-3 above.
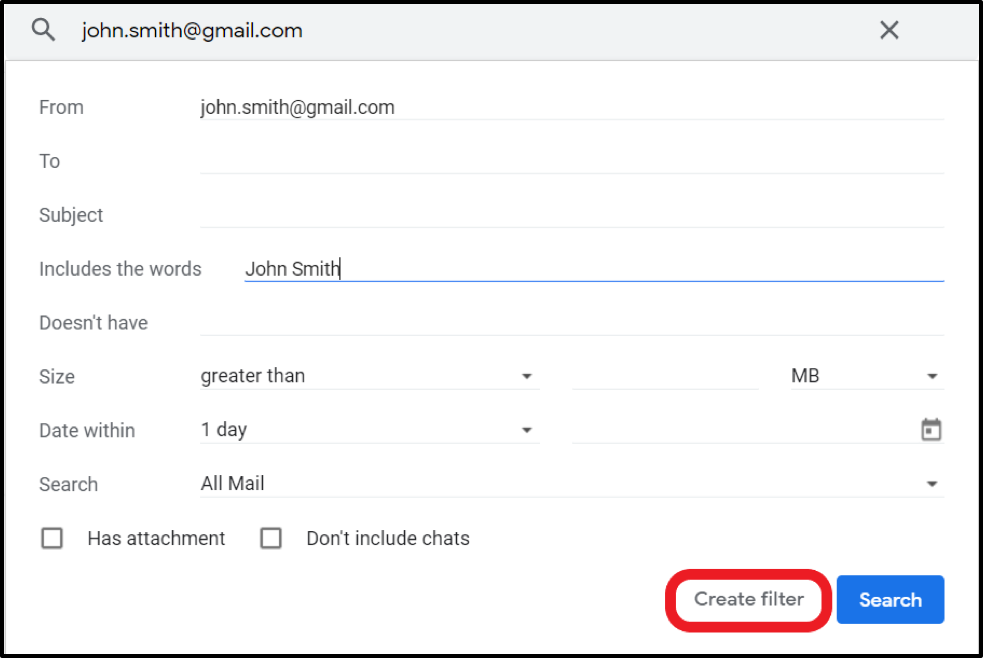
Step 2: Instead of clicking Search, click Create filter.

Step 3: You’re then asked to choose an action to connect to that filter. You can choose to star it, delete it, archive it, or give it a label, among several other actions.
How to Sort Gmail by Sender on Mobile Using Gmail App
Step 1: Launch the Gmail app and log in using your username and password.
Step 2: Tap on the search bar at the top of the screen.
Step 3: Type in the email address of the sender whose message you want to locate.
Step 4: Tap the search icon.
Step 5: All the emails from and to that sender will be displayed.
The Gmail app doesn’t let you enter any other search criteria such as email size, date, subject line. That said, if you enter certain keywords, then it might be able to find the email.
Why Would You Need to Sort Gmail by Sender?
There are many reasons for sorting your inbox by sender. Firstly, if you want to look for one or more emails from a specific sender, it’s extremely time-consuming to scroll through your inbox to locate them. Being able to quickly locate a list of emails from a particular sender saves a lot of searching time.
Secondly, it can be helpful to locate specific contacts within an email thread. When you have several lengthy threads in your inbox, looking for a specific piece of information from a specific sender can be a laborious task. By identifying all the emails from that sender, you can hone in and find that information much more quickly.
Thirdly, if you’re in the habit of clearing out your inbox from time to time, or if you want to delete all messages from a particular sender, then sorting your inbox by sender can speed up the process immensely. You can even set up a filter to automatically delete any new emails from that sender.
How to Make Use of Labels for Sorting Emails
Aside from acting as a folder system for organizing your incoming emails, labels in Gmail can also help you quickly locate email messages. Here are a 6 ways you can make the most out of Gmail’s label feature:
1. Apply labels while you’re composing an email
If you get into a good routine of attaching a label to every email you send, then it saves you from having to remember to do it when the reply lands in your inbox.
2. Apply labels while archiving
If you want to archive an email in Gmail, it will be found in “All Mail.” To make it easier to find in future, choose a relevant label to attach to it.
3. Use labels to categorize your emails
One of the main benefits of Gmail’s label system is that – unlike folders – you can assign as many labels to your emails as you like. Use them to categorize and keep track of your emails in the way that works best for you.
4. Organize labels into groups
To make the most of labels as folders, aim to create a hierarchy of labels and nested labels.This will help you to arrange your inbox into a visual representation of your projects and tasks.
5. Use Gmail’s built-in labels to carry out searches
You can make use of Gmail’s labels when you’re searching for specific emails. For example, in the search bar, you can search for “label:inbox” or “label:promotions.”
6. Color-code your labels
Colors can be assigned to labels by clicking the small arrow next to the label name in your label list, letting you locate emails more easily.
In summary
Sorting your Gmail inbox by sender will help you manage your emails and control your influx of messages. Being able to quickly locate specific senders will help you to find information more quickly, and setting up filters will let you automatically organize your inbox.
If you want to bring your emailing productivity to the next-level than check out Gmail extensions such as Right Inbox. Installing Right Inbox will effectively upgrade your Gmail with superpowers such as email tracking, automated email follow ups, email reminders and recurring emails
Track emails, email reminders & templates in Gmail for free
Upgrade Gmail with the features it’s missing
Add to GmailDavid Campbell
David Campbell is the editor of the Right Inbox blog. He is passionate about email productivity and getting more done in less time.


