Sometimes your trash folder in Gmail can get a little busy. A cluttered inbox – no matter whether it’s your primary Inbox, spam, or trash – doesn’t help you keep productive.
That said, Gmail empties your trash for you every 30 days.
So why do you need to empty your trash when Gmail does it for you automatically?
- If you’re a busy professional, then you likely have a lot of unwanted trash in that folder. These emails still count towards your storage quota, so it’s always best to keep that down.
- You should always take the approach that unwanted emails can be a problem for email security – no matter which folder they live in.
Now that you know the why, let’s take a look at the how. Here’s an easy to follow step-by-step guide:
How to Empty Trash in Gmail on Desktop
Step 1. Make sure you’re logged into Gmail.
Step 2. On the left-hand navigation, you need to locate the Trash option underneath More. If you have many folders, you may need to expand the menu to make it visible.
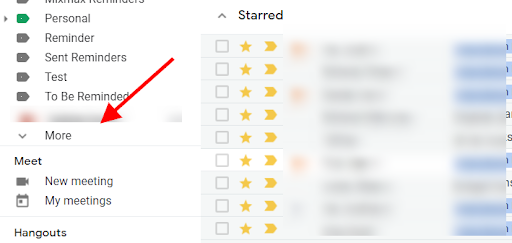
Step 3. You should now be in the Trash folder. At the top, there is an option to Empty Trash now. Simply click that.
![]()
Step 4. You’ll now see an option to confirm that you want to delete these messages, just to make sure that you don’t delete anything by accident.
Step 5. Click OK.
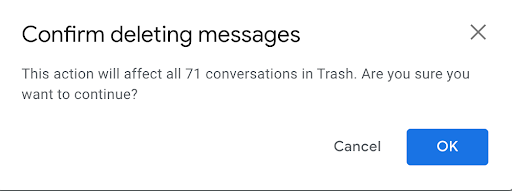
Step 6. You should now have an empty Trash folder.
If you don’t want to delete every single message, follow these steps:
Step 1. Make sure you’re logged into Gmail.
Step 2. On the left-hand navigation, you need to locate the Trash option underneath More. If you have many folders, you may need to expand the menu to make it visible.
Step 3. When you have reached the Trash page, you can then select all the messages you want to delete.
Step 4. To do this, you click the check buttons to the left of each message.

Step 5. As you start to click the messages you want to delete from Trash, you should see an option at the top to Delete forever.
Step 6. When you finish making your selection of messages to delete, simply click the Delete forever option.

Step 7. That’s it, now you know exactly how to empty your trash in Gmail.
Additional Reading: How to Retrieve Archived Emails in Gmail
How to Empty Trash in Gmail on Mobile (Android and iOS)
What if you’re not using Gmail on PC, or don’t have access to a computer? No problem at all. Here are the steps to empty your Gmail trash on Android and iOS devices:
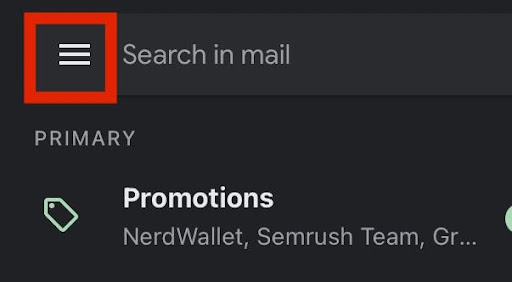
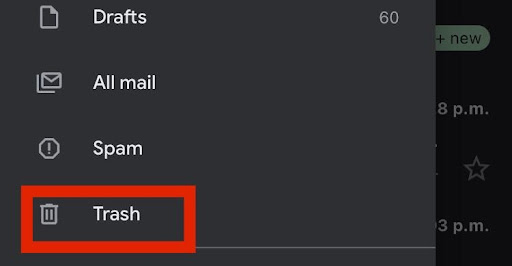
Step 1: First, open up your Gmail app, then tap on the three-line menu at the top left.
Step 2: Tap on Trash.
Step 3: Tap on Empty trash now.
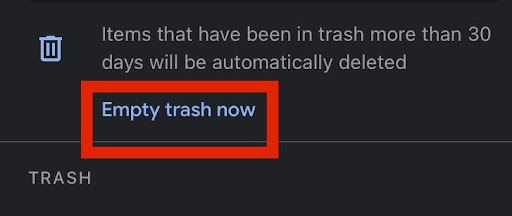
All of your emails in the trash folder will now be deleted permanently.
Other Ways to Clean Up Your Gmail Account
Periodically deleting (for real) by emptying the trash folder is great digital hygiene. However, there are plenty of other ways to keep your Gmail cleaned up.
Let’s look at some other methods for keeping your Inbox organized and conducive to productivity,
First we need to access the “Filter Messages Like These” option in Gmail:
Select an email that you would like to organize more effectively:
And click on the “More” menu.

Now click on “Filter Messages Like These.”
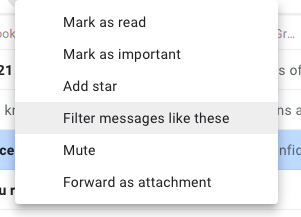
On the following screen, you will see several options to filter your email.
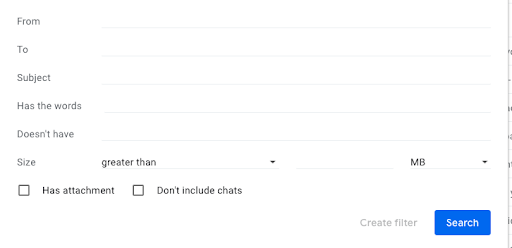
You can select the important element(s) of the email that you want to filter for, such as:
- From – Any email from a particular sender or senders
- To – Any email sent to a particular email address (useful if you run multiple email addresses via one Gmail account)
- Subject – Any time a particular subject line appears
- Has the words – Any time an email contains certain words (ex: “Free Money”)
- Doesn’t have – Any time an email lacks particular words
- Size – Filter based on how large or small the email is
- Has attachment – Determine if the filter applies to emails with or without attachments
- Don’t include chats – Decide if you want the filter to apply to chats, or only emails
Now, click on Create Filter, where you’ll be taken to the screen where we decide what to actually do with the emails containing the qualities we just specified.
On this page, you can choose what happens to these types of emails with a range of actions. Then, click “Create Filter” again and watch as your Inbox applies the changes.
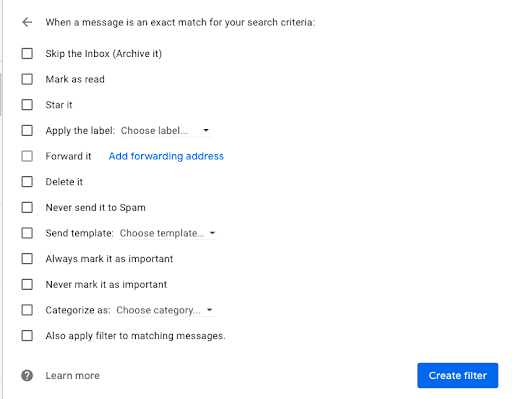
So, how can we actually use these filters to tidy up our Gmail?
6 Additional Ways to Clean Up Gmail (Instead of Emptying Trash)
- Label – Create a label for emails of this type (such as “Emails from John Smith”). They will appear in their own folder on the sidebar to the left.
- Archive – Send emails like these to the archive folder. They won’t be deleted so you can access them when you want to, but they also won’t crowd your inbox.
- Retrofit – Select “also apply filter to matching messages” to retroactively apply this filter to any existing emails with the same characteristics (instead of simply applying the filter to future emails).
- Categorize – Send emails with these criteria to Primary, Social, or Promotion tabs automatically.
- Delete – Send any emails like this to the trash instantly.
- Always mark as important – Make sure these emails appear with the yellow arrow next to them, indicating they’re important and ensuring you don’t miss them.
How to Empty Trash in Gmail — Frequently Asked Questions (FAQ)
Do I have to empty my trash manually in Gmail?
You certainly don’t need to empty your Gmail trash if you don’t want to. However, keep in mind that with most plans — such as the free one — you have a storage limit. If you have emails sitting around, it could cut into your storage limits.
Why should I empty my trash in Gmail?
If you spend a good amount of time in email or online, staying free of clutter is important. It helps you focus and forget unimportant emails instead of letting them simply pile up.
How do I empty trash in Gmail?
Follow the easy step-by-step instructions in the article above to empty your trash in under a minute.
How long will emails stay in trash if I don’t empty it?
By default, Gmail will hang onto your emails that you put into trash for 30 days. Therefore, you can simply wait until they are automatically deleted if that’s your preference.
Track emails, email reminders & templates in Gmail for free
Upgrade Gmail with the features it’s missing
Add to GmailDavid Campbell
David Campbell is the editor of the Right Inbox blog. He is passionate about email productivity and getting more done in less time.
![How to Empty Trash in Gmail [Desktop & Smartphone]](https://www.rightinbox.com/wp-content/uploads/1539796_RI_EmptyTrashGmail_v2_011123-441x293.jpg)
