Everyone likes an organized inbox. It’s easier on the eye, and can help you feel more in control of your day and all the tasks on your to-do list. Even more importantly, though, it saves you time, so you’re able to find messages quickly and categorize your emails in a way that works best for you.
Using Right Inbox for Gmail [Recommended]
If you want to make your life in Gmail easier, Right Inbox is an excellent Google Chrome extension to install.
Right Inbox comes with numerous productive features out of the box, such as:
- Reminders — set reminders for yourself, so you can follow up or check on key conversations when you need to without remembering.
- Private Notes — jot down key notes from emails, clients, and projects without anyone else invading your privacy.
- Tracking — see who’s opening your emails how many times and when, all within Gmail.
- Sequences —sequences in Right Inbox let you automate emails over the course of time, so that you can convert prospects or follow up on leads without reinventing the wheel.
Why you Need to Create Folders
The average worker sends or receives around 121 business emails a day. That’s 15 per hour. If you include personal emails in addition to sales and junk emails, you’ll likely end up with around 200 emails in your inbox each day. So having them categorized and stored in folders helps you to quickly locate them instead of having to search through a crowded inbox.
Gmail also helps you to separate out your primary emails from other rudimentary groups, like Promotions, Social, Updates and Forums. To do this, go to the cog in the top right, and click Configure inbox.
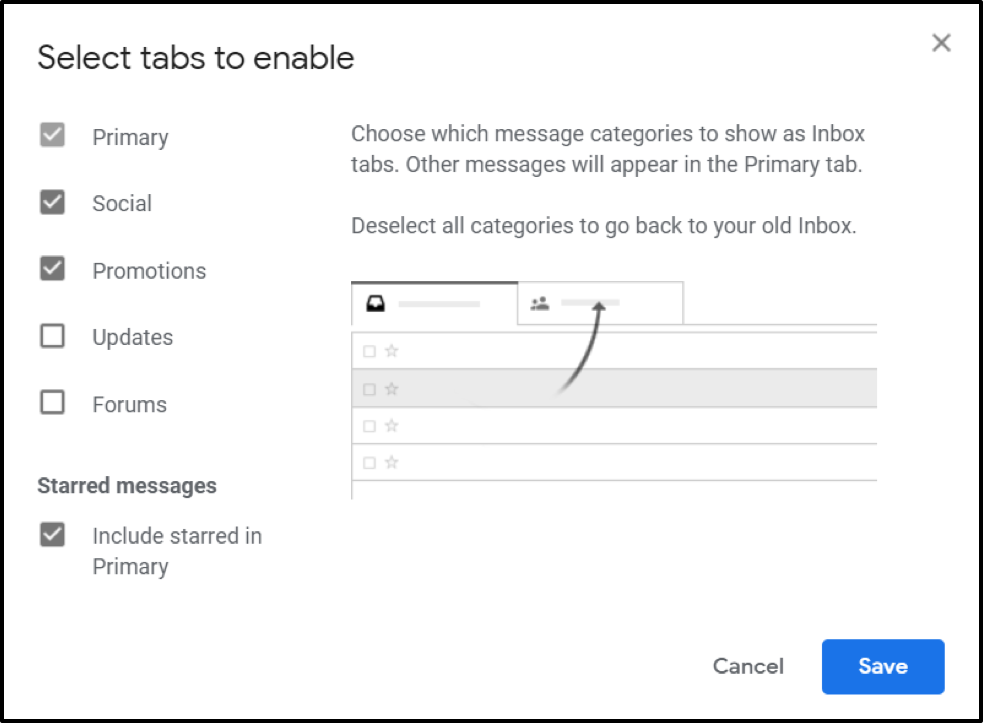
If you want to bring a bit more organization to your emails, then folders will help you to store your messages in dedicated places.
Folders vs. Labels
Previously, to organize your inbox, you would need to create folders into which you’d manually place your emails as they arrived. The folder system was a hierarchy of parent folders and subfolders which could become quite complicated.
You were also limited to one folder per email. That created an issue if you were working on several projects, and were managing those projects with folders in your inbox. If your manager sent you an email covering more than one project, it was difficult to know which folder to put it in.
Gmail solved this issue by introducing “labels.” Labels, which are effectively digital sticky notes, are the new folders. You’re able to assign several different labels to each email.
How to Create Labels and Nested Labels
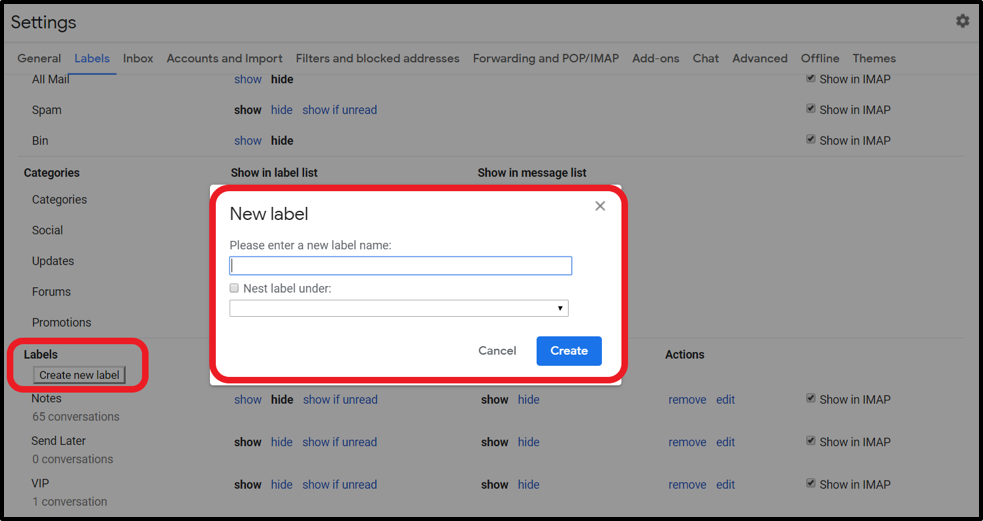
To create a new label:
Step 1: Click the gear icon in the top right of your Gmail, and click Settings.
Step 2: Click on the Labels tab.
Step 3: Click Create new label.
Step 4: Click Create.
How to Assign Labels to your Messages
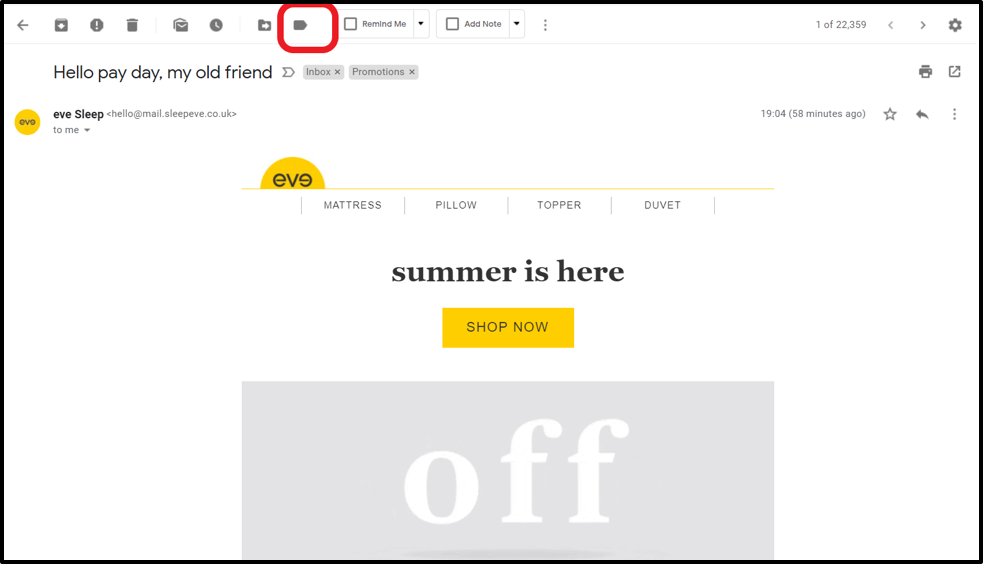
To assign a label to a message you’ve received:
- Open the message.
- Click the label button (this is a tag icon).
- Choose the label you want to assign, or type in a new label name.
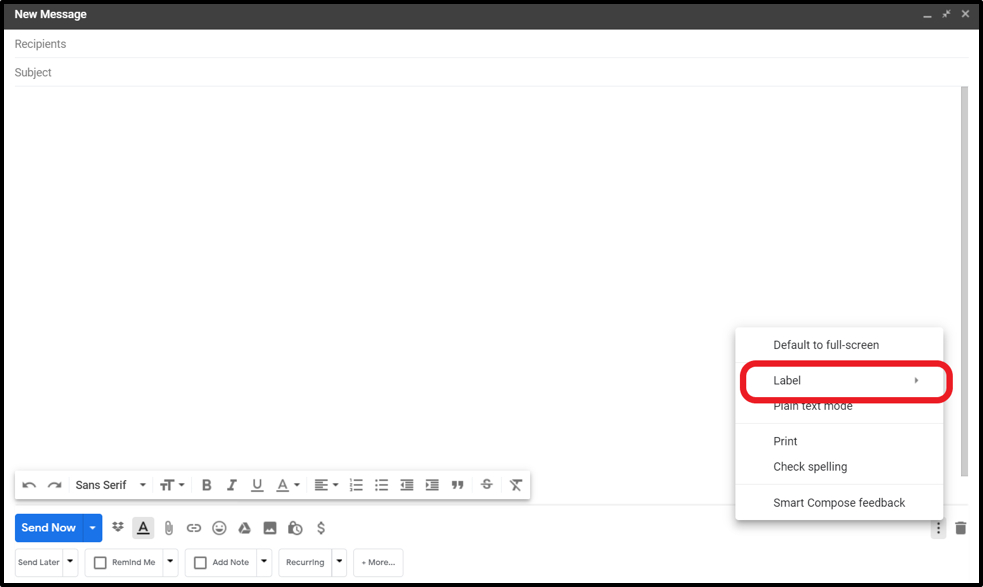
To assign a label to a message you’re sending:
- Click Compose message.
- At the bottom right, click on the three dots.
- Click label, and then choose the label you want to assign.
Automatically assign a label based on search criteria
If you want to make sure certain emails are assigned a label, then Gmail lets you do this:
1. Go to the search bar in Gmail and click the caret on the right-hand side.
2. Insert your search criteria. For example, if you want to assign a label to a particular email address, then enter that address in the From line.
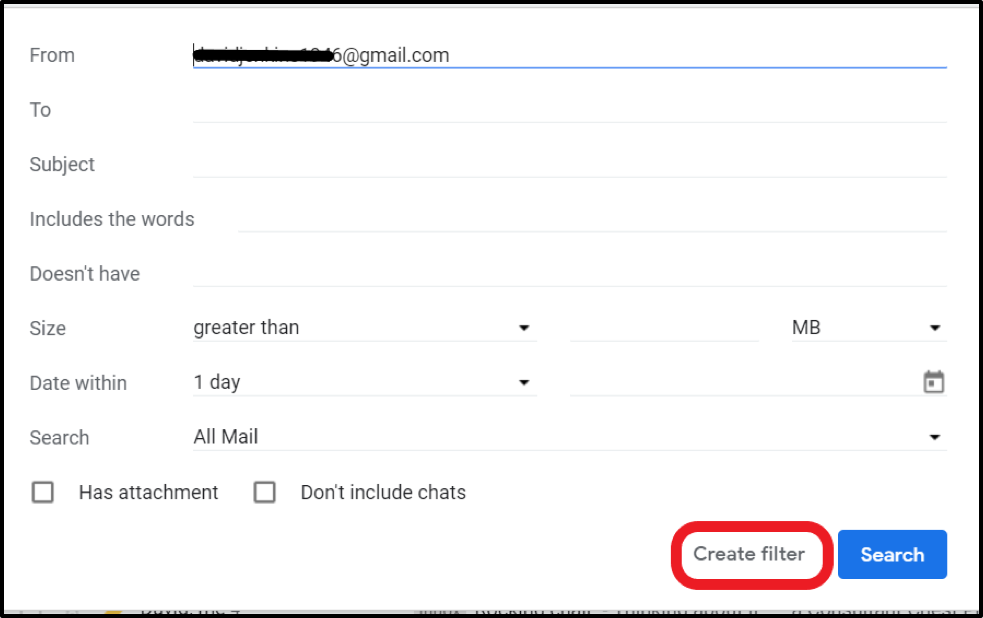
3. Click Create filter.
4. Apply the label by clicking on the drop-down Choose label.
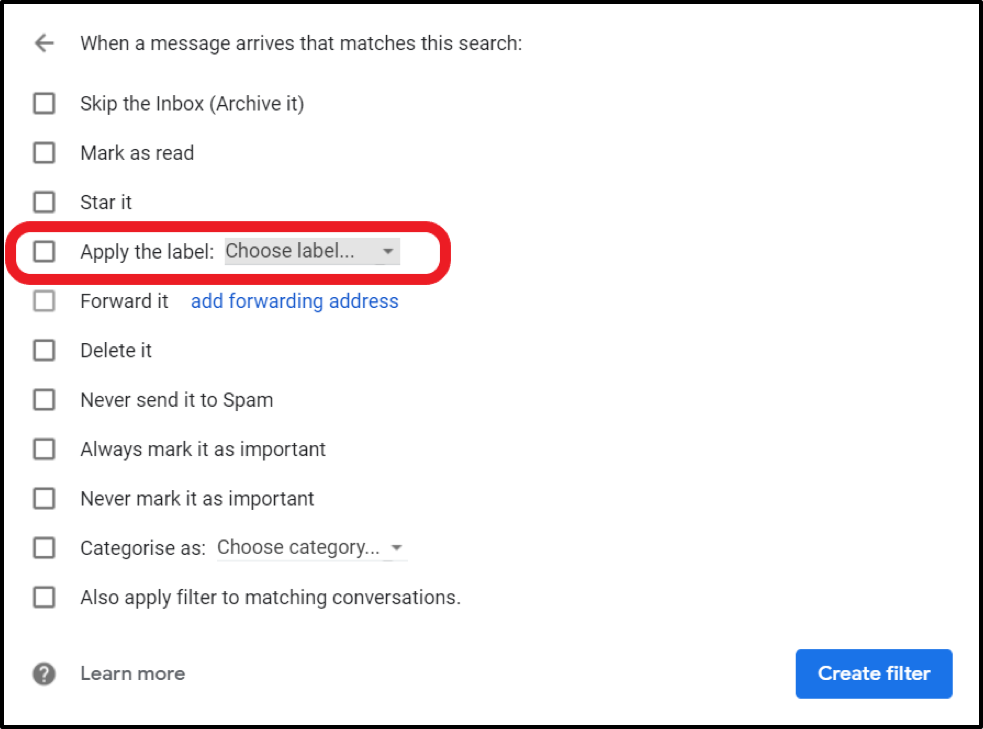
5. Click Create filter.
How to Create Folders on Phone
Step 1. Open your Gmail app and sign in.
Step 2. Tap on the three horizontal lines in the top left hand corner.
Step 3. Scroll through the menu to Labels and tap on + Create new
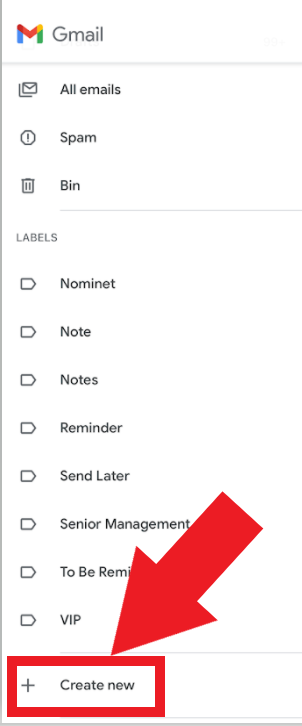
Step 4. Type the name of your new label.
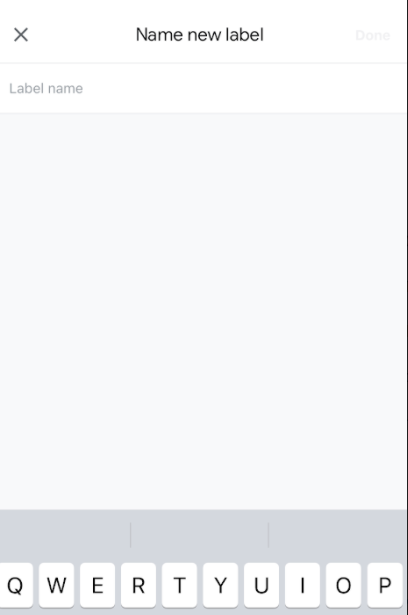
Step 5. Tap Done.
Step 6. Your new folder will be found in the left hand menu under Labels.
Right Inbox Labels
Whether it’s an incoming or an outgoing email, Right Inbox gives you additional label options.
Say you’ve written an email but you’re not ready to send it; you can choose to click on the Remind me option so that Right Inbox sends you a reminder note at a specific time.
If you click on the drop-down next to the Remind me box, you can choose to label the email as Reminder when reminded or To be reminded until reminded, or both.
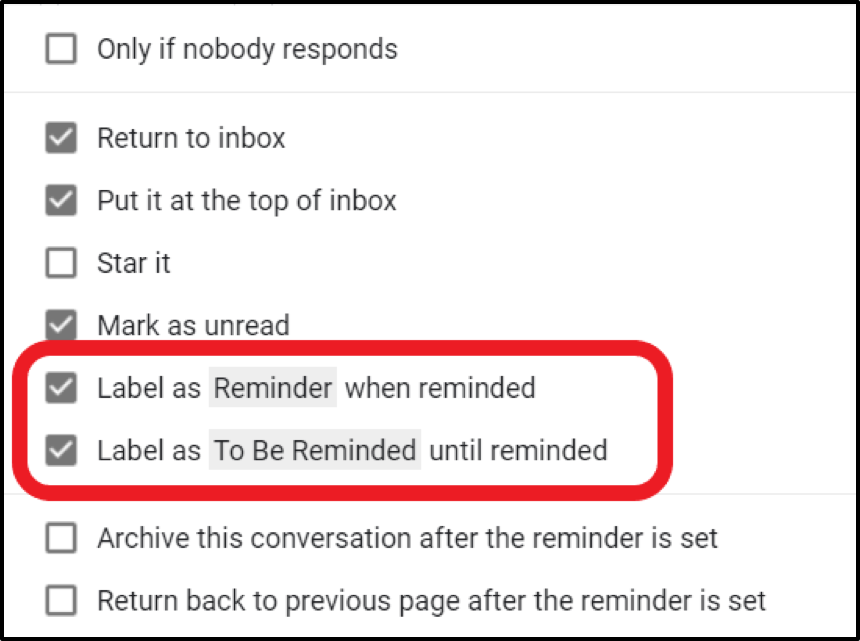
You can also assign a note to an email, which only you will see. If you click on the drop-down next to Add note, you’ll see it’s set to Label as note. You can also check the box to Display the note automatically when you click into the email.

Managing your labels
Nested labels
Within Gmail, you can create sub-labels, which are known as “Nested Labels,” underneath a parent label.
To create a new nested label, you have two options:
Option 1:
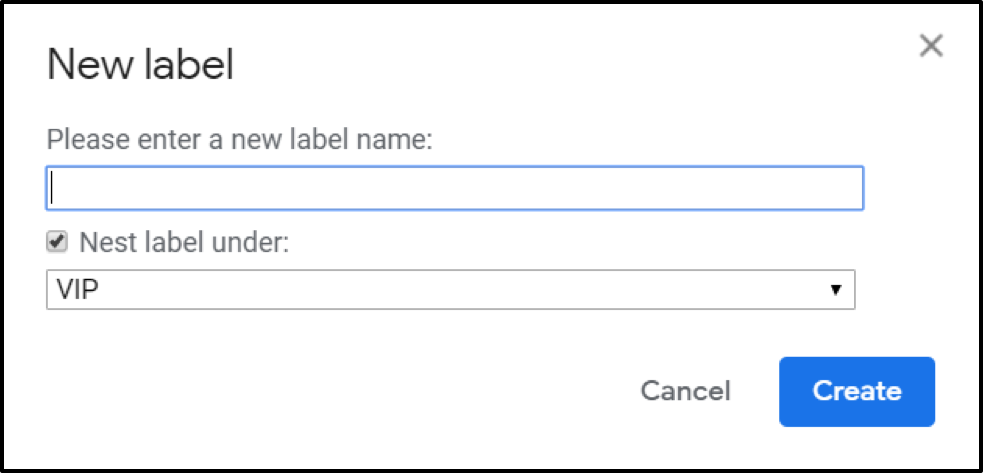
- Click Create new label.
- Enter the new label name where it says Please enter new label name.
- Check the Nest label under box, and select a label from the drop-down menu (We’ll show you how to create your own label later).
Option 2:
1.Scroll to your label in the left-hand menu in your Gmail.
2.Click on the three dots.
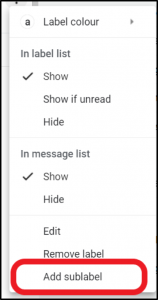
3. Click Add sub-label.
4. Enter the name of your new sub-label, and click Create.
Moving a label underneath another label
- In the Labels tab, click Edit in the Actions column next to the label you want to move.
- Check Nest label under: and then select a destination label from the dropdown.
- Click Save.

Renaming a label
If you want to rename a label:
- Go to your label list and click on the arrow next to the label.
- Click Edit.
- In the pop-up menu, enter your new label name.
Removing labels from your messages
If a label becomes obsolete, then you can remove it, either individually, or in bulk.
Individually
- Open the email and click on the tag icon below the search bar.
- Uncheck the label you want to stop using.
- Alternatively, click the X button next to the label name in your label list.
In bulk
- Select the label you want from your label list.
- Select the emails from which you want to remove the label.
- Click Remove label.
Hiding or showing labels
To manage which labels appear in your label list:
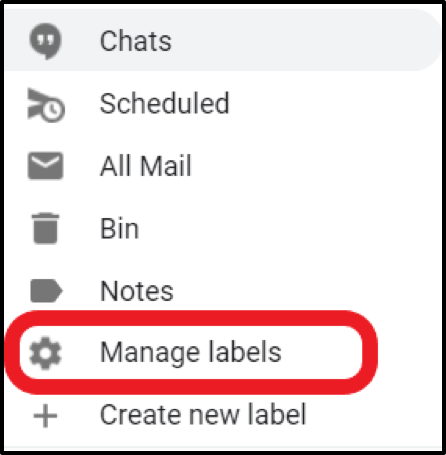
- Go to Manage labels in the left-hand menu in Gmail.
- You’ll see all your labels listed out.
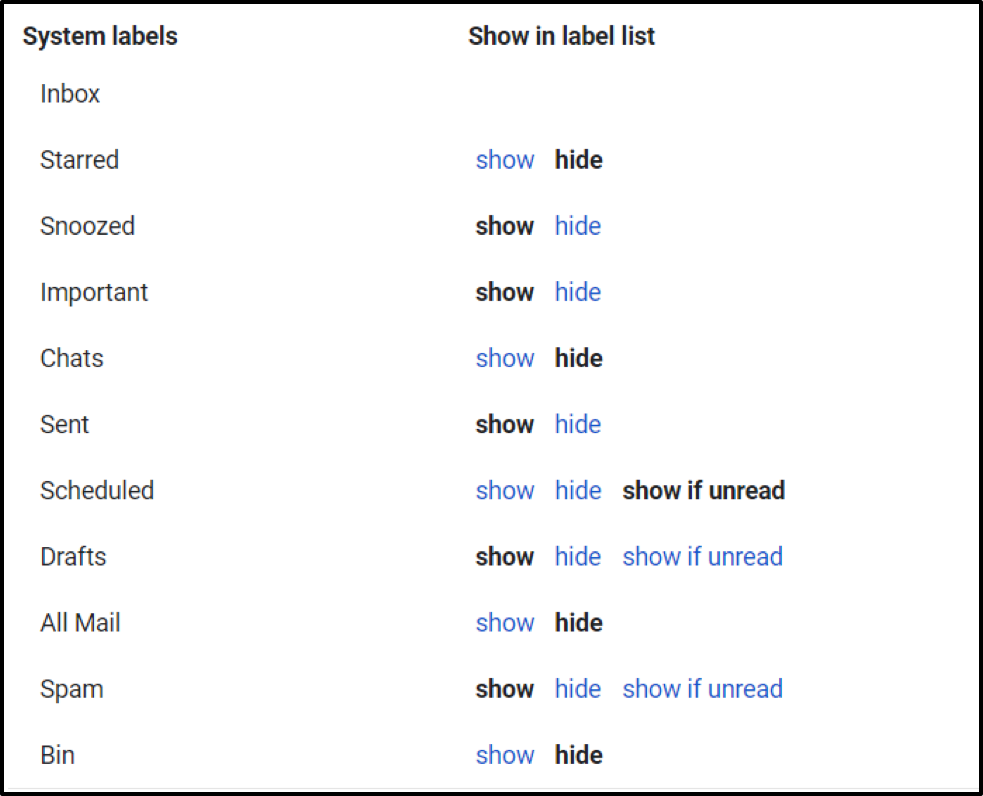
- To make sure a label shows in your list in the left-hand menu in Gmail, click Show next to that label.
- To hide it, click Hide.
- For some of them, such as Drafts or Scheduled, you’ll be given the option of Show if unread.
Color-coding labels
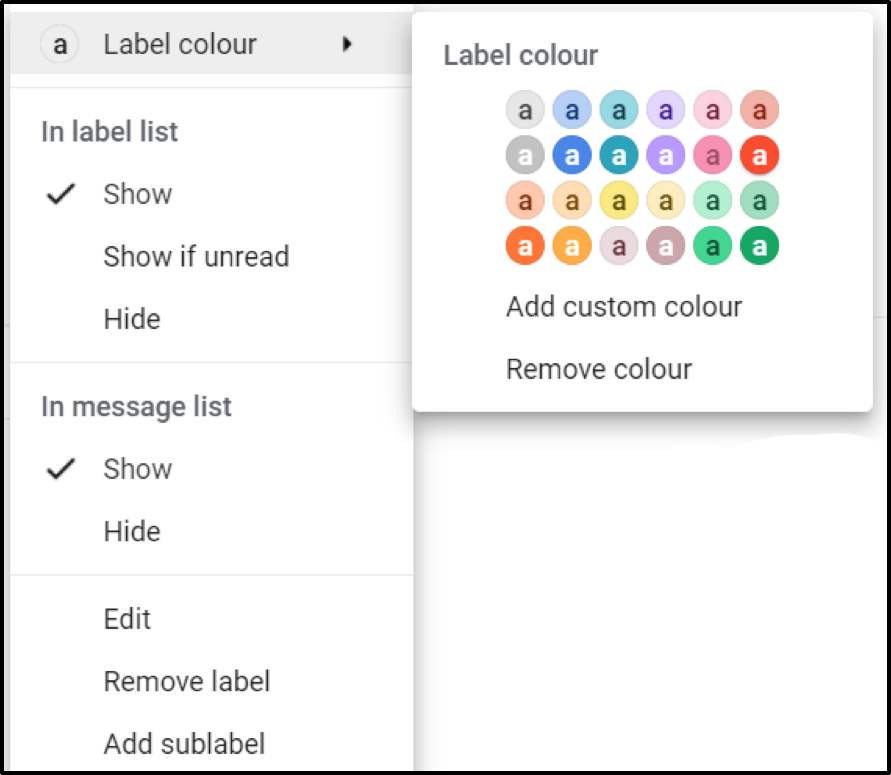
Color-coding your labels can help you to quickly identify which emails are coming through:
- In your label list in the left-hand column of Gmail, find the label you wish to color-code.
- Click on the arrow to the right of the label, click on Label color, and choose your color.
5 Gmail Folder Ideas To Keep Your Inbox Up-To-Date
One way to stay at inbox zero, or at least feel like you’re in control, is to create time-sensitive folders. This way, as soon as you receive an incoming email, you can filter it off into one of your folders, knowing that you’ll deal with it at an allocated time.
1. Inbox – this is your main inbox. Your messages will drop into here, where you will sort them into folders as soon as possible.
2. Urgent – this is where you put your emails that you have to deal with today. This folder should be empty at the end of every working day.
3. This week – you’ll deal with these emails this week, so ensure that by the end of the week there are no emails left in this folder.
4. This month – emails in this folder don’t need urgent attention, but will need to be dealt with over the next few weeks.
5. No action required – These are emails that are there for your reference, and don’t require any pressing action.
You could consider using colors to code your folders to distinguish the urgent (red) from the no action required (green).
Gmail has some useful tricks to help you to organize your incoming and outgoing messages. Labels help you to categorize your emails quickly, so that you can cut down on the time spent searching through a crowded inbox for a specific message.
Right Inbox gives you extra help with this too, giving you the option to label the emails that you need reminders for, and to which you’ve assigned a note.
Folders in Gmail — Frequently Asked Questions (FAQs)
What is the purpose of labels in Gmail?
Labels — or folders — in Gmail are a great way to stay organized. You can classify emails by certain organizations, friends, family members, clients, and more. That way, your inbox doesn’t stay cluttered.
What is the benefit of labels in Gmail?
The benefit of labels in Gmail is having more control over your workflow. Instead of being distracted by emails from your bank, then a client, then your airline ticket receipts for instance, everything is in its own category.
How many labels can you have in Gmail?
You can have up to 500 labels in your Gmail. For most use cases, this is more than enough.
Why can’t I see Gmail labels?
If you can’t see labels, you need to turn them on under the settings in Gmail first. Then, they will display on the left hand side of your inbox.
Track emails, email reminders & templates in Gmail for free
Upgrade Gmail with the features it’s missing
Add to GmailDavid Campbell
David Campbell is the editor of the Right Inbox blog. He is passionate about email productivity and getting more done in less time.
